The other day a friend asked our group chat if anyone had managed to be able to get a docker container talk to network services hosted on a Hyper-V VM on the same host. This is defintiely possible depending on your requirements and many of the solutions I've seen online point you towards using a virtual router to route between the V-Switches. This is a perfectly viable solution, but im my friends case too much mucking around.
My development environment, currently, is a Win 10 host (running the 2004 insiders build), with Hyper-V enabled and Docker Desktop installed and configured in WSL2 mode. For those not familiar with the architecture, it's explained on the Docker website. Simply put though, Docker Desktop runs in a Hyper-V utility VM (or two). You won't see these VMs in the Hyper-V console, but the networking does show up under a WSL V-Switch. By default, it's an Internal VSwitch, allowing VMs behind it NAT access to your network.
If you are able to, you can just place your Hyper-V guest - maybe a more persistant VM running say a SQL Server, onto that WSL switch. You'll need to then manually configure the networking and away you should be able to go. If you need to access the VM, or expose that port, you can do that either using the IP of the VM (as if it was another networked host) or by using Hyper-V port forwarding. Whatever floats your boat.
Figuring out the networking
Because Docker Desktop runs under WSL2 in a utility VM, you can actually use WSL to access that VM like any other WSL box.
Here you can see me list the WSL boxes available
PS C:\Users\ellio> wsl -l
Windows Subsystem for Linux Distributions:
docker-desktop-data (Default)
docker-desktop
Ubuntu
I'll quickly show you my host networking here. Note the WSL interface, and the Default Switch interface
PS C:\Users\ellio> ipconfig

Windows IP Configuration

Ethernet adapter Ethernet:

   Media State . . . . . . . . . . . : Media disconnected
   Connection-specific DNS Suffix  . :

Ethernet adapter vEthernet (Default Switch):

   Connection-specific DNS Suffix  . :
   Link-local IPv6 Address . . . . . : fe80::35de:bdc1:f32c:995f%39
   IPv4 Address. . . . . . . . . . . : 172.29.240.1
   Subnet Mask . . . . . . . . . . . : 255.255.240.0
   Default Gateway . . . . . . . . . :

Wireless LAN adapter Wi-Fi:

   Connection-specific DNS Suffix  . :
   Link-local IPv6 Address . . . . . : fe80::bc2f:aa2d:84c:6a3e%5
   IPv4 Address. . . . . . . . . . . : 192.168.1.112
   Subnet Mask . . . . . . . . . . . : 255.255.255.0
   Default Gateway . . . . . . . . . : 192.168.1.1

Ethernet adapter vEthernet (WSL):

   Connection-specific DNS Suffix  . :
   Link-local IPv6 Address . . . . . : fe80::54e9:ad7c:36af:2e53%45
   IPv4 Address. . . . . . . . . . . : 172.28.160.1
   Subnet Mask . . . . . . . . . . . : 255.255.240.0
   Default Gateway . . . . . . . . . :
PS C:\Users\ellio>
It's easy to take a peek at what's happening in docker-desktop like this:
PS C:\Users\ellio> wsl -d docker-desktop
DESKTOP-GAH4M0A:/tmp/docker-desktop-root/mnt/host/c/Users/ellio# echo $SHELL
/bin/sh
DESKTOP-GAH4M0A:/tmp/docker-desktop-root/mnt/host/c/Users/ellio# ip addr show
1: lo: <LOOPBACK,UP,LOWER_UP> mtu 65536 qdisc noqueue state UNKNOWN group default qlen 1000
    link/loopback 00:00:00:00:00:00 brd 00:00:00:00:00:00
    inet 127.0.0.1/8 scope host lo
       valid_lft forever preferred_lft forever
    inet6 ::1/128 scope host
       valid_lft forever preferred_lft forever
2: bond0: <BROADCAST,MULTICAST,MASTER> mtu 1500 qdisc noop state DOWN group default qlen 1000
    link/ether 56:4e:ee:fe:44:3f brd ff:ff:ff:ff:ff:ff
3: dummy0: <BROADCAST,NOARP> mtu 1500 qdisc noop state DOWN group default qlen 1000
    link/ether 0a:79:09:35:b2:54 brd ff:ff:ff:ff:ff:ff
4: eth0: <BROADCAST,MULTICAST,UP,LOWER_UP> mtu 1500 qdisc mq state UP group default qlen 1000
    link/ether 00:15:5d:dd:76:6f brd ff:ff:ff:ff:ff:ff
    inet 172.28.161.30/20 brd 172.28.175.255 scope global eth0
       valid_lft forever preferred_lft forever
    inet6 fe80::215:5dff:fedd:766f/64 scope link
       valid_lft forever preferred_lft forever
5: sit0@NONE: <NOARP> mtu 1480 qdisc noop state DOWN group default qlen 1000
    link/sit 0.0.0.0 brd 0.0.0.0
So we've worked out that
* my host's Wifi0 interface is 192.168.1.112
* my host has a WSL vEtherenet adapter with the address 172.28.160.1/20 (the gateway for that network)
* my docker-desktop VM's interface is 172.28.161.30
Let's go get a random docker container and add that to the frey. On my host, i'll start a docker container and get it's networking...
PS C:\Users\ellio> docker ps
CONTAINER ID        IMAGE               COMMAND             CREATED             STATUS              PORTS               NAMES

PS C:\Users\ellio> docker run -it ubuntu:latest /bin/bash
root@311654b27044:/#

... installing net-tools ...

root@311654b27044:/# ifconfig
eth0: flags=4163<UP,BROADCAST,RUNNING,MULTICAST>  mtu 1500
        inet 172.17.0.2  netmask 255.255.0.0  broadcast 172.17.255.255
        ether 02:42:ac:11:00:02  txqueuelen 0  (Ethernet)
        RX packets 10410  bytes 15162011 (15.1 MB)
        RX errors 0  dropped 0  overruns 0  frame 0
        TX packets 5311  bytes 291211 (291.2 KB)
        TX errors 0  dropped 0 overruns 0  carrier 0  collisions 0

lo: flags=73<UP,LOOPBACK,RUNNING>  mtu 65536
        inet 127.0.0.1  netmask 255.0.0.0
        loop  txqueuelen 1000  (Local Loopback)
        RX packets 0  bytes 0 (0.0 B)
        RX errors 0  dropped 0  overruns 0  frame 0
        TX packets 0  bytes 0 (0.0 B)
        TX errors 0  dropped 0 overruns 0  carrier 0  collisions 0
We can see the docker container is using a separate network, with the container IP being 172.17.0.2.
That also actually shows up in dockers network config for those interested.
Here's that from my host
PS C:\Users\ellio> docker network list
NETWORK ID          NAME                DRIVER              SCOPE
dca925c84f5a        bridge              bridge              local
ade822bc531f        host                host                local
0f3449af80ab        none                null                local
PS C:\Users\ellio> docker network inspect bridge
[
    {
        "Name": "bridge",
        "Id": "dca925c84f5ab9346e67efcfb6876c4b22a973452982c0a8047129ead6c56f6e",
        "Created": "2020-08-22T06:58:12.8275757Z",
        "Scope": "local",
        "Driver": "bridge",
        "EnableIPv6": false,
        "IPAM": {
            "Driver": "default",
            "Options": null,
            "Config": [
                {
                    "Subnet": "172.17.0.0/16",
                    "Gateway": "172.17.0.1"
                }
            ]
        },
        "Internal": false,
        "Attachable": false,
        "Ingress": false,
        "ConfigFrom": {
            "Network": ""
        },
        "ConfigOnly": false,
        "Containers": {
            "311654b27044f9ad253405f530e29b15492249723e42761db9f1ba51d61385ad": {
                "Name": "wizardly_shirley",
                "EndpointID": "0e700d97cb7c03bd98b03baa5f6307e7290e995f87783f4493b08925046554d2",
                "MacAddress": "02:42:ac:11:00:02",
                "IPv4Address": "172.17.0.2/16",
                "IPv6Address": ""
            }
        },
        "Options": {
            "com.docker.network.bridge.default_bridge": "true",
            "com.docker.network.bridge.enable_icc": "true",
            "com.docker.network.bridge.enable_ip_masquerade": "true",
            "com.docker.network.bridge.host_binding_ipv4": "0.0.0.0",
            "com.docker.network.bridge.name": "docker0",
            "com.docker.network.driver.mtu": "1500"
        },
        "Labels": {}
    }
]
From the docker instance, we can see that we can connect through the two nested virtual switches from the container to the host
root@311654b27044:/# ping 192.168.1.112
PING 192.168.1.112 (192.168.1.112) 56(84) bytes of data.
64 bytes from 192.168.1.112: icmp_seq=1 ttl=37 time=0.833 ms
^C
--- 192.168.1.112 ping statistics ---
1 packets transmitted, 1 received, 0% packet loss, time 0ms
rtt min/avg/max/mdev = 0.833/0.833/0.833/0.000 ms
root@311654b27044:/# ping 172.17.0.1
PING 172.17.0.1 (172.17.0.1) 56(84) bytes of data.
64 bytes from 172.17.0.1: icmp_seq=1 ttl=64 time=0.031 ms
^C
--- 172.17.0.1 ping statistics ---
1 packets transmitted, 1 received, 0% packet loss, time 0ms
rtt min/avg/max/mdev = 0.031/0.031/0.031/0.000 ms
root@311654b27044:/# ping 172.28.161.30
PING 172.28.161.30 (172.28.161.30) 56(84) bytes of data.
64 bytes from 172.28.161.30: icmp_seq=1 ttl=37 time=0.690 ms
^C
--- 172.28.161.30 ping statistics ---
1 packets transmitted, 1 received, 0% packet loss, time 0ms
rtt min/avg/max/mdev = 0.690/0.690/0.690/0.000 ms
From here, we can add a Hyper-V guest to the mix. I'm going to be lazy, and use the Vagrant Hyper-V provider. The config I used is below:
vm_cpus = 2
vm_memory = 2048
vm_name = "centos-wintest"
vm_forwarded_port = 8080

$script = <<-'SCRIPT'
ip address add 172.28.161.10/20 dev eth0
ip route add default via 172.28.160.1 dev eth0
echo "nameserver 192.168.1.1" > /etc/resolv.conf
yum install -y nmap-ncat
SCRIPT

# Vagrant config
Vagrant.configure("2") do |config|

    config.vm.define "centos-wintest" do |awx|

        # Pull down the CentOS source box
        awx.vm.box = "centos/7"
        awx.vm.hostname = vm_name

        config.vm.synced_folder ".", "/vagrant"

        # Setup the VM on the HyperV provider
        config.vm.provider "hyperv" do |h|
            # Note: https://www.vagrantup.com/docs/hyperv/limitations.html
            # The HyperV provider pretty much ignores any network configuration
            h.cpus = vm_cpus
            h.memory = vm_memory
            h.vmname = vm_name
        end

        config.vm.provision "shell", inline: $script

    end

end
When we bring the box up, I'll select the WSL VSwitch. You can see this in the logs below:
PS C:\_\source\vagrant\windows-docker-net-test> vagrant up --provider hyperv
Bringing machine 'centos-wintest' up with 'hyperv' provider...
==> centos-wintest: Verifying Hyper-V is enabled...
==> centos-wintest: Verifying Hyper-V is accessible...
==> centos-wintest: Importing a Hyper-V instance
    centos-wintest: Creating and registering the VM...
    centos-wintest: Successfully imported VM
    centos-wintest: Please choose a switch to attach to your Hyper-V instance.
    centos-wintest: If none of these are appropriate, please open the Hyper-V manager
    centos-wintest: to create a new virtual switch.
    centos-wintest:
    centos-wintest: 1) Default Switch
    centos-wintest: 2) WSL
    centos-wintest:
    centos-wintest: What switch would you like to use? 2
    centos-wintest: Configuring the VM...
==> centos-wintest: Starting the machine...
==> centos-wintest: Waiting for the machine to report its IP address...
    centos-wintest: Timeout: 120 seconds
    centos-wintest: IP: fe80::215:5dff:fe01:7011
==> centos-wintest: Waiting for machine to boot. This may take a few minutes...
    centos-wintest: SSH address: fe80::215:5dff:fe01:7011:22
    centos-wintest: SSH username: vagrant
    centos-wintest: SSH auth method: private key
    centos-wintest:
    centos-wintest: Vagrant insecure key detected. Vagrant will automatically replace
    centos-wintest: this with a newly generated keypair for better security.
    centos-wintest:
    centos-wintest: Inserting generated public key within guest...
    centos-wintest: Removing insecure key from the guest if it's present...
    centos-wintest: Key inserted! Disconnecting and reconnecting using new SSH key...
==> centos-wintest: Machine booted and ready!
==> centos-wintest: Setting hostname...
==> centos-wintest: Rsyncing folder: /cygdrive/c/_/source/vagrant/windows-docker-net-test/ => /vagrant
==> centos-wintest: Running provisioner: shell...
    centos-wintest: Running: inline script
    centos-wintest: Loaded plugins: fastestmirror
    centos-wintest: Determining fastest mirrors
    centos-wintest:  * base: mirror.colocity.com
    centos-wintest:  * extras: mirror.as24220.net
    centos-wintest:  * updates: mirror.as24220.net
    centos-wintest: Resolving Dependencies
    centos-wintest: --> Running transaction check
    centos-wintest: ---> Package nmap-ncat.x86_64 2:6.40-19.el7 will be installed
    centos-wintest: --> Processing Dependency: libpcap.so.1()(64bit) for package: 2:nmap-ncat-6.40-19.el7.x86_64
    centos-wintest: --> Running transaction check
    centos-wintest: ---> Package libpcap.x86_64 14:1.5.3-12.el7 will be installed
    centos-wintest: --> Finished Dependency Resolution
    centos-wintest:
    centos-wintest: Dependencies Resolved
    centos-wintest:
    centos-wintest: ================================================================================
    centos-wintest:  Package           Arch           Version                    Repository    Size
    centos-wintest: ================================================================================
    centos-wintest: Installing:
    centos-wintest:  nmap-ncat         x86_64         2:6.40-19.el7              base         206 k
    centos-wintest: Installing for dependencies:
    centos-wintest:  libpcap           x86_64         14:1.5.3-12.el7            base         139 k
    centos-wintest:
    centos-wintest: Transaction Summary
    centos-wintest: ================================================================================
    centos-wintest: Install  1 Package (+1 Dependent package)
    centos-wintest: Total download size: 345 k
    centos-wintest: Installed size: 740 k
    centos-wintest: Downloading packages:
    centos-wintest: warning: /var/cache/yum/x86_64/7/base/packages/libpcap-1.5.3-12.el7.x86_64.rpm: Header V3 RSA/SHA256 Signature, key ID f4a80eb5: NOKEY
    centos-wintest: Public key for libpcap-1.5.3-12.el7.x86_64.rpm is not installed
    centos-wintest: --------------------------------------------------------------------------------
    centos-wintest: Total                                              535 kB/s | 345 kB  00:00
    centos-wintest: Retrieving key from file:///etc/pki/rpm-gpg/RPM-GPG-KEY-CentOS-7
    centos-wintest: Importing GPG key 0xF4A80EB5:
    centos-wintest:  Userid     : "CentOS-7 Key (CentOS 7 Official Signing Key) <[email protected]>"
    centos-wintest:  Fingerprint: 6341 ab27 53d7 8a78 a7c2 7bb1 24c6 a8a7 f4a8 0eb5
    centos-wintest:  Package    : centos-release-7-6.1810.2.el7.centos.x86_64 (@anaconda)
    centos-wintest:  From       : /etc/pki/rpm-gpg/RPM-GPG-KEY-CentOS-7
    centos-wintest: Running transaction check
    centos-wintest: Running transaction test
    centos-wintest: Transaction test succeeded
    centos-wintest: Running transaction
    centos-wintest:   Installing : 14:libpcap-1.5.3-12.el7.x86_64                               1/2
    centos-wintest:
    centos-wintest:   Installing : 2:nmap-ncat-6.40-19.el7.x86_64                               2/2
    centos-wintest:
    centos-wintest:   Verifying  : 2:nmap-ncat-6.40-19.el7.x86_64                               1/2
    centos-wintest:
    centos-wintest:   Verifying  : 14:libpcap-1.5.3-12.el7.x86_64                               2/2
    centos-wintest:
    centos-wintest:
    centos-wintest: Installed:
    centos-wintest:   nmap-ncat.x86_64 2:6.40-19.el7
    centos-wintest:
    centos-wintest: Dependency Installed:
    centos-wintest:   libpcap.x86_64 14:1.5.3-12.el7
    centos-wintest: Complete!
Test it out
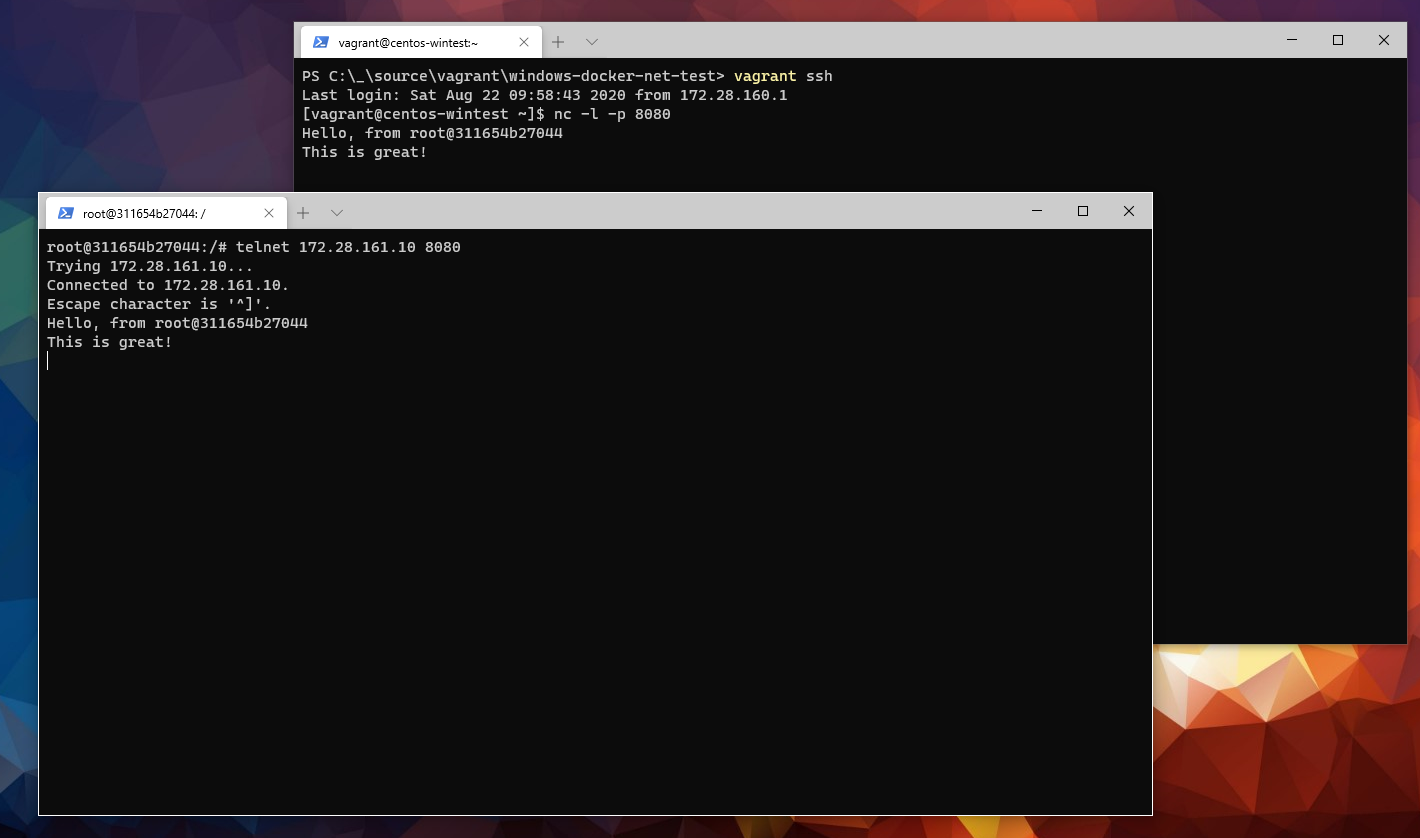
OK, now we can SSH into that machine and expose some kind of service. I'll do.. er, netcat.

Ok, now back to the docker container. Let's send something to the Hyper-V VM.
Wrapping up
Assuming you know addresses ahead of time, and can configure static addresses this appears to be a much easier option.
This would work just as well using docker networking in the other direction. You could expose a docker networking service, and connect to that using the IP address of your docker-desktop VM :)
Hopefully, this helps some people out in the future!
Cheers