Fixing Claude Cowork's Network Conflict on Windows
An Update (18th Feb '26)
It looks like this is hardcoded, and post reboot Cowork has reset all the networking configuration.
After resetting itself, it broke my WSL/Docker networking and was repaired by replacing the vswitch again
The other day I ran into an interesting problem with Claude's new Cowork feature. For those not familiar, Cowork is Claude's local development environment that runs in a lightweight VM on your machine. It's pretty neat - except when it decides your network is its network.
The issue? Claude Cowork uses a seemlingly hardcoded network range of 172.16.0.0/24 for its internal NAT network. If you're on a home or corporate network (or have a VPN) that also uses this range, the Cowork VM can't access the internet. If you're like me, you might also start to break your own netowork connectivity. Anyway, routing conflicts ensue, and you're left with a very expensive text editor.
Luckily, this is definitely fixable, but it requires mucking around with Windows Host Network Service (HNS), taking ownership of MSIX package files, and manually creating some of Coworks VHDX files. If that sounds like too much mucking around... well, you're not wrong. But it's also the only way I've found to make this work.
Others on anthropics/claude-code github appear to be having similar pain:
- Searching for
smol-binon shows 15 issues at the time I wrote this (link) - Searching for
NATshows 50 results (link)
What we're dealing with
Before we dive in, here's what's happening under the hood:
- Claude Cowork runs in a Hyper-V utility VM (similar to how Docker Desktop works on Windows)
- It creates an HNS NAT network called
cowork-vm-naton172.16.0.0/24 - If your network already uses that range, Windows gets confused about routing
- The VM starts but has no internet connectivity
The fix involves creating a new HNS network on a non-conflicting subnet and convincing Cowork to use it instead.
Prerequisites
You'll need:
- Administrative PowerShell access
- Windows with Hyper-V/Container features enabled
- The HNS PowerShell module (we'll install this)
- A bit of patience
Step 1: Get the HNS module
First, we need the HNS PowerShell module. Some HNS powershell cmdlets may be available by default, but the ones you need to create won't usually be. You can install the additional module, and you'll need to adjust your execution policy if you haven't already.
In an Administrative (read: elevated) powershell session:
# Allow script execution for current user
Set-ExecutionPolicy -ExecutionPolicy RemoteSigned -Scope CurrentUser

# Install the HNS module
Install-Module -Name HNS -Scope CurrentUser -AllowClobber:$true
The installation will warn you about command conflicts - this is expected. When prompted about the untrusted repository, answer Y.
Step 2: Clean up the conflicting network
Now we need to stop Cowork and remove the conflicting network. This is the nuclear option, but it's necessary.
# Stop all Claude processes
Stop-Process -Name "cowork-svc" -Force -ErrorAction SilentlyContinue
Stop-Process -Name "Claude" -Force -ErrorAction SilentlyContinue

# Kill the Cowork VM
hcsdiag kill cowork-vm

# Wait for cleanup
Start-Sleep -Seconds 3

# Get the conflicting network ID
$broken_cowork_network = Get-HnsNetwork | Where-Object {$_.Name -eq "cowork-vm-nat"}

# Remove it (replace with your actual ID)
Remove-HnsNetwork -InputObjects $broken_cowork_network
Step 3: Create a new network on a safe subnet
Here's where we create the replacement network. I'm using 172.24.0.0/24, but you can use any subnet that doesn't conflict with your network. Common safe options include 10.200.0.0/24 or 192.168.200.0/24. Your mileage may vary. For those less familiar with addressing, we usually set the gateway address to the first address of the subnet.
# Import HNS module with prefix to avoid conflicts
Import-Module HNS -Prefix "Admin"

# Create new NAT network
New-AdminHnsNetwork -Type NAT -AddressPrefix "172.24.0.0/24" `
 -Gateway "172.24.0.1" -Name "cowork-vm-nat"

# Verify it was created
Get-HnsNetwork | Where-Object {$_.Name -eq "cowork-vm-nat"}
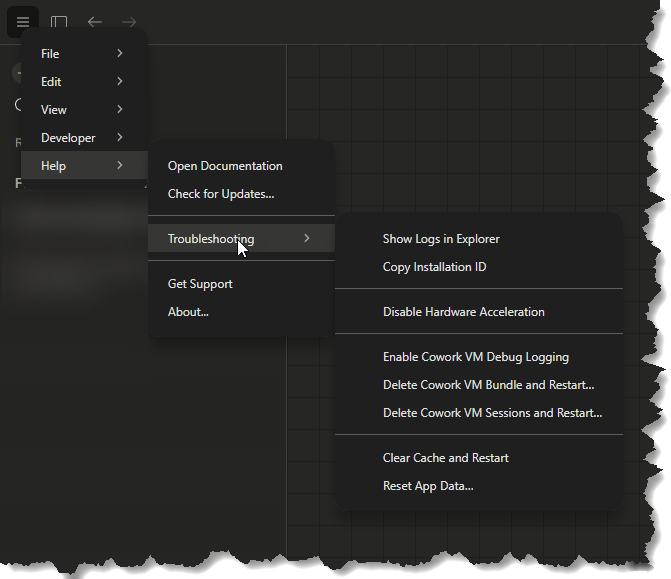
At this point, you can restart the Claude Desktop app, jump into Cowork and watch the VM fail to start again. If you take a peek at the troubleshooting logs (Help > Troubleshooting > Show Logs In Explorer) you can enable the VM debug logs and take a peek.
In my case the VM fails to start because the sessiondata.vhdx disk wasn't created by Coworks bootstrapping.
Step 4: Create the missing sessiondata.vhdx
Cowork expects a sessiondata.vhdx file in your user directory. As i said, for some reason, it doesn't create this automatically.
Luckily, it doesn't contain data, so we can just create an empty disk.
$bundleDir = "C:\Users\$env:USERNAME\AppData\Roaming\Claude\vm_bundles\claudevm.bundle"
New-Item -ItemType Directory -Path $bundleDir -Force

# Create a 10GB dynamic disk
New-VHD -Path "$bundleDir\sessiondata.vhdx" -Dynamic -SizeBytes 10GB
I went with 10GB to start with and used -Dynamic to let it auto-grow. You might want to set it statically if you're short on space.
Restart the claude app (and/or the Claude service, which is actually cowork-svc.exe) and you'll see the VM start, but fail again.
Have another look at the logs and you'll probably see it complain about failing to copy smol-bin.vhdx.
Step 5: Fix the VHDX file structure
And this is where things get interesting. The Cowork service expects to find smol-bin.x64.vhdx in a specific location within the MSIX package, but the file structure doesn't match. I noticed on github, other users complaining of issues related to EFS encryption. In my case, the source was not EFS encrypted. It was pretty easy to check...
PS C:\Users\elliotsegler> cipher.exe /c "C:\Program Files\WindowsApps\Claude_1.1.3189.0_x64__pzs8sxrjxfjjc\app\resources\smol-bin.x64.vhdx"

 Listing C:\Program Files\WindowsApps\Claude_1.1.3189.0_x64__pzs8sxrjxfjjc\app\resources\
 New files added to this directory will not be encrypted.

U smol-bin.x64.vhdx
The U means it's not encrypted. That's good, but issue for me is Cowork expects it elsewhere. Also, an easy fix.
We need to create the expected directory structure and copy the file.
First, take ownership of the WindowsApps package (this requires an elevated PowerShell):
# Take ownership of the resources folder
takeown /f "C:\Program Files\WindowsApps\Claude_1.1.3189.0_x64__pzs8sxrjxfjjc\app\resources" /r /d y

# Grant yourself full control
icacls "C:\Program Files\WindowsApps\Claude_1.1.3189.0_x64__pzs8sxrjxfjjc\app\resources" /grant "${env:USERNAME}:F" /t
Note: The path Claude_1.1.3189.0_x64__pzs8sxrjxfjjc is version-specific. You'll need to replace this with your actual installed version path.
Now we create the expected directory structure:
$basePath = "C:\Program Files\WindowsApps\Claude_1.1.3189.0_x64__pzs8sxrjxfjjc\app\resources"

# Create vm_bundles directory
New-Item -ItemType Directory -Path "$basePath\vm_bundles\claudevm.bundle" -Force

# Take ownership and grant permissions
takeown /f "$basePath\vm_bundles" /r /d y
icacls "$basePath\vm_bundles" /grant "${env:USERNAME}:F" /t
I just got these location from the nicely detailed error logs from the VM. Check the cowork_vm_node.log after using the Show Logs in Explorer option.
Now copy the VHDX files:
$source = "$basePath\smol-bin.x64.vhdx"

# Copy to both possible names Cowork might look for
Copy-Item $source "$basePath\vm_bundles\claudevm.bundle\smol-bin.vhdx" -Force
Copy-Item $source "$basePath\vm_bundles\claudevm.bundle\smol-bin.x64.vhdx" -Force

# Verify
Get-ChildItem "$basePath\vm_bundles\claudevm.bundle" -Filter *.vhdx
Step 6: Copy VHDX to user directory
Cowork attempts to copy the VHDX from the package location to your AppData directory on startup. Due to file locking issues, this appears to sometime fails. I'm not sure if this is nessecary, but i did it anyway; Let's do the copy manually:
# Ensure Cowork is stopped
Stop-Process -Name "cowork-svc" -Force -ErrorAction SilentlyContinue

$destDir = "C:\Users\$env:USERNAME\AppData\Roaming\Claude\vm_bundles\claudevm.bundle"
New-Item -ItemType Directory -Path $destDir -Force

# Use robocopy for reliable copying
robocopy "C:\Program Files\WindowsApps\Claude_1.1.3189.0_x64__pzs8sxrjxfjjc\app\resources\vm_bundles\claudevm.bundle" $destDir smol-bin.x64.vhdx /COPY:DAT /R:3 /W:1

# Also copy as smol-bin.vhdx
Copy-Item "$destDir\smol-bin.x64.vhdx" "$destDir\smol-bin.vhdx" -Force

# Verify
Get-ChildItem $destDir -Filter *.vhdx
Step 7: Test it out
Now start Claude and see if Cowork comes up:
# Start Claude (the Cowork service should start automatically, if not...)
Start-Service CoworkVMService

# Wait a few seconds, then verify the VM started
Start-Sleep -Seconds 5
hcsdiag list

# Check the new network is being used
Get-HnsEndpoint | Where-Object {$_.Name -like "*cowork*"}
If everything worked, you should see the Cowork VM in hcsdiag list, and the endpoints should have IP addresses in your new subnet (e.g., 172.24.0.x).
Open the cowork app and after a short while, the VM should load and your Cowork workspace should function.
Wrapping up
Assuming you followed all the steps and didn't hit any weird edge cases, Cowork should now be functional with internet connectivity. The VM will use your new subnet instead of the conflicting 172.16.0.0/24 range.
A few important notes:
- Package updates: When Claude updates, you may need to repeat steps 5-6 as the WindowsApps folder will be replaced with a new version
- MSIX integrity: Modifying the WindowsApps package breaks the package signature, but Windows still allows the app to run since you have ownership
- Subnet selection: Make sure to choose a subnet that doesn't conflict with any of your networks (local, VPN, etc.)
If Cowork still fails to start, check the Event Viewer for Hyper-V-Compute-Operational logs, verify the network exists with Get-HnsNetwork, and make sure the VHDX files are in the right places.
Hopefully this helps some people out. If you're running into this issue, you're probably on a corporate network with a VPN, and you're definitely not alone.
It's probably worth subscribing to some of those issues on github.
This does look a lot like a product that's built by AI (Claude obviously in this case) and the experience was... Jarring, but hey it's marked Experimental for a reason. I'm sure Anthropics team and robot army will sort this out soon. If anyone from Anthropic sees this, next time please consider configurability as a day 1 feature :)
I'll tinker with this for a while and see how much more productivity I can get from my AI and report back later.
If anyone has questions, reach out!
Cheers